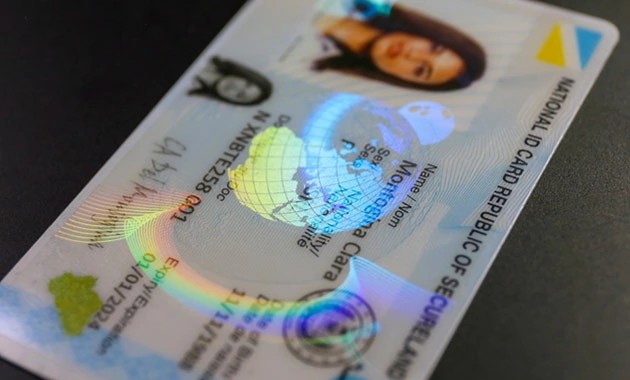
We've all seen the movie scene — a character holds a card under a blue light and a hidden image suddenly appears. It looks like magic. It's actually just physics, and once you understand how it works, you'll never look at a fake driver's license the same way again. For premium scannable fake id cards, UV overlays and holograms aren't decoration. They're the features that stop a trained eye from immediately identifying your fake identification as a prop.
I get a lot of questions about this. Can I add UV to my own cards? Why does my card glow differently under different lights? What's actually inside the hologram? The technology has become advanced enough in 2026 that home replication is essentially impossible at a professional level — but understanding how it works will help you identify a high-quality fake id when you see it, and spot a cheap imitation from across the room.
Ultraviolet Light: What It Actually Is
Ultraviolet radiation sits just beyond the visible spectrum. Human eyes can't see UV light directly, but certain molecules — called phosphors — absorb UV energy and re-emit it as visible light. That's the glow. The UV light excites electrons in the phosphor compound, bumping them to a higher energy state. When those electrons fall back down, they release the absorbed energy as photons in the visible range. Different phosphors release different wavelengths, which is why UV overlays can glow in multiple colors from a single light source.
The important detail that most buyers miss: UV light comes in multiple frequencies, and the specific frequency matters enormously. The two most common in this industry are 395nm (longer wavelength, cheaper to source, glows under almost any UV light) and 365nm (shorter wavelength, used by professional verification equipment and most serious collectors). A card using 395nm ink will look great under a blacklight party bulb but will appear nearly invisible under a professional 365nm lamp — which is exactly the lamp that anyone who knows what they're doing will use to test a card.
How UV Overlays Are Applied to Cards
On a properly manufactured UV overlay novelty ID, the UV-reactive ink isn't simply painted on the surface. It's applied in a separate print pass using a specialized UV ink system, typically through an offset lithography or screen printing process that allows for precise registration. Registration means the UV layer aligns correctly with the visible printed design beneath it.
This is where the quality separation happens. Budget operations print a generic UV pattern — usually just a shield, a logo, or a text repeat — and apply it to every card regardless of state. Premium manufacturers print a custom UV layer that corresponds exactly to the design: the California bear in the right position, the specific state seal at the correct scale, the invisible text running along the correct border zones. If you shine a 365nm light on a poorly made card, the UV pattern won't line up with anything underneath it. On a premium card, the UV layer and the visible layer are one coherent design.
Holograms: Microscopic Engineering
A hologram is not printed. This is the most common misconception. A hologram is a physical microstructure — a surface covered in microscopic ridges, grooves, and facets that are measured in nanometers. When light strikes these structures, it diffracts: it bends and splits into component wavelengths, similar to how a prism separates white light into a spectrum. Different groove angles reflect different colors at different viewing angles. That's why holograms appear to shift colors as you move them.
The quality distinction in the novelty world comes down to whether the hologram is a generic foil or a custom-mastered design. Generic foils use a standard repeating pattern — the word GENUINE or a generic shield — and are manufactured in bulk. Custom holographic laminates are created from a Master Die, an expensive precision-machined tool that defines the microstructure for a specific design. Making a custom die for the Texas spinning star costs thousands of dollars. That cost is why you can't get a genuine kinetic state hologram from a $50 card.
| Feature Type | Technology | Visual Effect | Light Required | Production Cost |
|---|---|---|---|---|
| Standard UV | 395nm fluorescent ink | Glows under blacklight | Any UV lamp | Very Low |
| Premium UV | 365nm registered multi-color | Precise colored patterns aligned to design | 365nm lamp | Medium-High |
| Generic Hologram | Stock foil sticker | Rainbow shimmer, no movement | Any direct light | Very Low |
| Custom Hologram | Master-die laminate | State-specific static image, color-shift | Direct point light | High |
| Kinetic Hologram | Variable-angle Master Die | Image appears to move | Direct point light | Very High |
| OVI | Metallic interference flakes in ink | Color shift (e.g., green → gold) | Any direct light | Very High |
OVI: The Color-Shifting Ink That Isn't a Foil
Optically Variable Ink occupies a completely different category from holograms. OVI is an ink — it's printed, not laminated — but it contains tiny metallic flakes that are themselves multi-layered structures. These flakes are engineered so that the optical path length through the layers changes as you tilt the card, which shifts which wavelengths of light are constructively reinforced. The result is a smooth, clear color transition — usually green to gold, or magenta to green — that tracks with the angle of the light source.
You see OVI on the number 100 of a hundred-dollar bill and on the bear in California's current ID design. It's one of the most expensive security features to reproduce correctly because the flake manufacturing process is tightly controlled and the ink rheology (how it flows through a printer) is extremely specific. Cheap imitations will use a flat metallic ink that simply looks gold or green depending on the light angle — there's no smooth transition, no depth. Under a 10x loupe, real OVI shows individual metallic flakes. Fake OVI looks like flat metallic paint.
Testing These Features Yourself at Home
You don't need professional lab equipment. Two items are enough: a 365nm UV flashlight (the Convoy S2+ with a 365nm LED is the standard recommendation in the collector community) and a 10x jeweler's loupe.
For the UV test, go into a genuinely dark room — not just dim, but dark enough that you can't read text without the UV light. Shine the 365nm light across the card at a low angle and look for two things. First, check whether only the ink glows or if the entire card glows. A real Polycarbonate card should be largely UV-neutral. If the whole card turns bright blue or white, the plastic has optical brighteners — a common additive in cheap materials. Second, check the line quality of the UV pattern. On a premium UV overlay novelty ID, the edges of the UV design are sharp and clean. On a budget card, they blur and bleed.
For the hologram and OVI test, use a single-point light source — a desk lamp works perfectly, a ceiling light doesn't. Move the card in a slow circular motion and watch how the hologram tracks the light. A kinetic hologram's image will appear to shift position as you move. A generic foil just changes brightness. For OVI, position the card at about 30 degrees from horizontal and slowly tilt it toward you. Count how many distinct color zones you see during the transition. Real OVI shows at least three clear color states with smooth gradients between them. A cheap imitation shows two states with a hard, abrupt shift.
These visual features represent years of materials science and manufacturing investment. When they're done correctly on a UV overlay novelty ID, you're looking at a product built to the same standard as the real thing. If you want to see what that standard looks like in person, browse our premium novelty ID collection — every card we offer goes through a full UV and hologram quality check before it ships.